Mike Beech
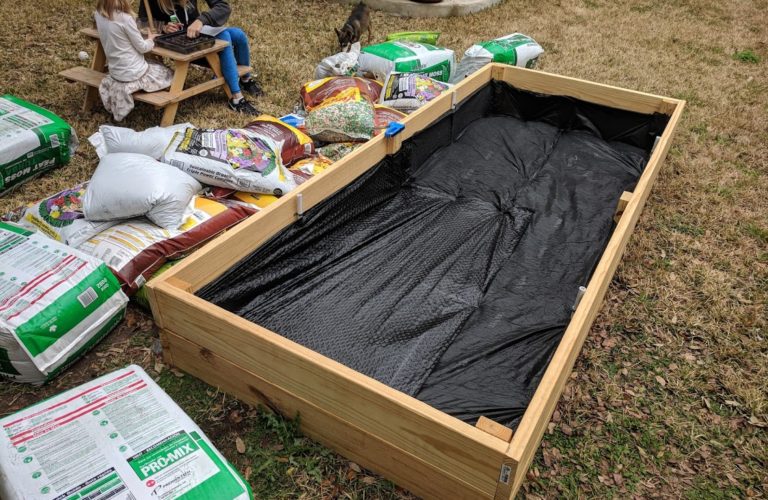
Here’s what you will need:
Supplies & Hardware
- (6) 2″ x 8″ x 8′ Pine or Cedar Boards (Do not use pressure treated)
- (1) 2″ x 4″ x 8′ Pine or Cedar Boards (Do not use pressure treated)
- (1) 1/2″ Diameter PVC Conduit (at least 6′)
- 2-1/2″ Decking Screws (at least 36)
- (8) Pipe Straps for 1/2″ Pipe
- Weed Mat
Tools
- Cordless Drill
- PVC Cutters
- Saw – Skill Saw, Miter, etc.
Gardening Mix (Mel’s Mix)
- 10 Cubic Feet Peat Moss
- 10 Cubic Feet Compost
- 10 Cubic Feet Vermiculite
Cut List
- (4) 8′ Sections of 2″ x 8″ (No cut needed)
- (4) 4′ Sections of 2″ x 8″
- (6) 15″ Sections of 2″ x 4″
- (4) 15″ Sections of 1/2″ PVC Conduit
- All of the above are cross cuts
The internet abounds with DIY plans for raised garden beds. The major difference here is that this bed is designed to be big and roomy. This larger, deeper bed is a great choice for the experienced gardener, but it is also recommended for newbies so long as you know your commitment to the backyard garden life is for real and not just a passing stage.
The greater surface area gives you the ability to have more of the crops you want, as well as room to grow vining crops like watermelon with less worry about them completely taking over. As well, the increased depth allows for a greater variety of crops, and more medium to turn over and enrich when sections need to be refreshed. Added bonus: no pre-existing grass or weed will be able to make the long trek upwards through all that garden soil to poke out and cause problems.
Complete all the cuts listed above, and find a flat part of the yard with enough clearance around all sides for a person to walk and work (ideally 3 feet or so). Create a right angle with one of your 8′ 2x8s and one of your 4′ 2x8s. Place one of your 15″ 2×4 sections vertically inside of this corner and attach the long boards to the 2×4 using two decking screws in each board.
Complete the remaining corners in exactly this fashion. Once the first layer of boards is completed, all that remains is to place the top layer in the same configuration and attach them to the 2x4s. While doing so, ensure that all walls and 2x4s are relatively flush on top.
You will have two 15″ sections of 2×4 remaining. These should be placed in the inside center each 8-foot side of the bed and attached with four screws through the outer board. These 2x4s will help to prevent outward bowing with all the soil and water weight that will be added over time, and will also help to prevent the boards from warping and splaying apart and creating a space where soil can escape.
The final step may seem optional, but I would strongly advise taking the time to do it. Garden beds can be completely ravaged by freezing weather, and one of the easiest ways to combat this is to turn the bed into a makeshift greenhouse that can capture and hold heat. This is accomplished with a simple plastic tarp, but it will be aided in functioning even better (while not damaging plants) by having a frame.
The 15″ PVC conduit sections are there as nothing more than a base for your makeshift greenhouse. Find the midpoints along each 8-foot section between the corners and the middle 2×4, and mark that spot. Here you will attach the 4 lengths of PVC to the inner walls of the bed. Two straps per pipe, one attached to the lower board, one to the upper. When it comes time to greenhouse, just choose a long, flexible rod of some kind, plant one end into the PVC on one side, bend it over and place the other end into the PVC on the other side. Two of these arches will serve you well as a frame to lay a tarp over without weighing down your precious plants!
In essence, the construction of this bed is basically creating a giant rectangle. In truth, the most critical part of this whole process is the gardening mix you’re going to put in your new bed. The suggested mix is called Mel’s Mix, a blend created by Mel Bartholomew for Square Foot Gardening. While the choice of whether or not to use Square Foot Gardening is up to you, the gardening mix works well for any style you choose, and is adaptable to many climates.
Before dumping your mix in your brand new bed, make sure you cover the bottom with a quality weed mat. While the depth of the beds prevents any prior grass or weeds from popping up, the mats are useful for water retention and maintaining the integrity of the soil underneath to lessen the chance of the beds shifting. Never a bad idea to staple the weed mat up the sides to the approximate height of your soil (approximately 12 in. with the amounts listed above). This can buy you a little more life from the boards, as it will be somewhat of a barrier between them and the soil/water.
The final step in preparing your new jumbo garden is to dump that garden mix in there! If you can find it at your local landscape supply store pre-mixed, go for it! If not, you will likely need to buy a lot of bags, and mix them as you dump them in. Spend about twice as long mixing as you do opening bags and dumping. A big pocket of pure vermiculite you missed could be a disaster for future roots. Once you have it good and blended, smooth it all out, then get to gardening!
Mike Beech
Mike Beech is an author, lifelong athlete, coach, bowhunter, angler, amateur anthropologist, and professional trophy dad. When he's not out selling agricultural/recreational land in his home state of Texas, he tries to spend as much time as he can convincing wild game to be his food.