Luke Shaffer
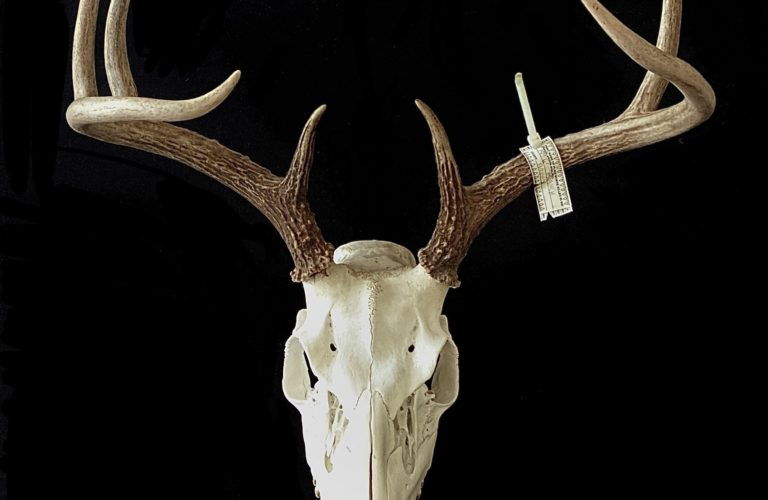
I was lucky enough to knock down a solid seven pointer at my mom’s the day before Thanksgiving. It’s definitely a fun story, but I’ll tell it another time. All that said, he’s a good looking deer, but not quite shoulder mount-worthy.

Taxidermy has a long and storied history amongst naturalists and hunters. The very popular head or shoulder mounts that we see for deer species are actually a variant of skin mounts. Skin mounts remove the hide of the animal and stretch it over a wooden frame, wool and wire, or other structures to recreate the shape of the animal. Modern taxidermy in North America uses polyurethane foam extensively for its light weight and consistency. While skin mounting can definitely recreate life-like details, it’s expensive and labor-intensive. As well, the popular foam forms can be difficult and costly to import from producers if you hunt outside of the U.S. or Canada.
Enter the European mount. So-named because of its popularity amongst the hunters of Europe, it is a cost-effective method to preserve your quarry with substantially lower turnaround time. With no need for the highly-detailed work of artists and specific materials that are hard to import, it has withstood the test of time as a means to capture a memory. In my opinion, the final product is also very aesthetically pleasing.
I did a Euro Mount last year with a smaller buck and used the tried and true “cover it in leaves and let the bugs do the work” method. It worked, but it took months and I’m not a patient guy; admittedly, not a great attribute for a hunter and angler.
My neighbor Mike down the street shared a method with me, and it was one he swore by. Surely it’s similar to the other methods you’ve seen, but this one has the Now You Try seal of approval.
The Stuff You Need
- One animal
- Large Pot – Minimum 16 Quarts
- Outdoor Propane Burner
- Propane
- 1 Cup Borax Laundry Soap
- 1/2 Cup Baking Soda
- 1/2 Cup Dish Soap
- Volume 40 Peroxide Cream
- Paint Brush
- Knife
- Aluminum Foil
- Garden Hose w/ Sprayer, or Pressure Washer
- Stiff-Bristled Scrub Brush
Note the “outdoor propane burner”. Do this outside and not in your kitchen. The smells that will emit from this thing are not what you would call “pleasant.” As my buddy Chris said, if there was a Euro Mount candle fragrance, it would be “somewhere between divorce and rock bottom”.
The Process
You’re looking at a full day project.
- Take down the animal. You know – the easy part!
- After gutting, skinning, and quartering, skin the head. Now, this part takes some getting used to. It also takes a certain, shall we say, mindset. It’s one thing to pull guts out. It’s another thing to peel a face off and dig out the eyeballs. But you need to get as much skin, cartilage, and meat off as possible, to make the rest of the process more smooth. The head can be kept in a cooler or freezer until you’re ready to simmer it.
- Wrap the antlers in foil. Be sure it’s tight at the base of the antlers. This will help protect them from the soap, but also from scorching on the pot.

- Bring a pot of water up to a boil. It should be high enough to fully submerge the skull, but keeping as much of the antlers above the water as possible.
- Add 1 cup of Borax. This stuff is stronger than the stuff you use for your washing machine. It must be this brand.
- Reduce heat to a simmer and add the skull. Simmer 3 hours. Add water as necessary to keep skull submerged. This will gelatinize a lot of the cartilage and essentially “braise” the meat, making it easier to remove.

- Remove the skull from the water and let cool enough to handle. Discard water.
- Using a stiff knife, remove any remaining meat and cartilage from the skull. If you left the lower jaws on (I did), they and the tongue should come off easily at this point. If your blade is thin enough or using a screwdriver, insert it into the back cavity of the skull and scramble the brain. This will make them easier to remove after the second boil. This is also a great time to take you stiff-bristled scrub brush and get the flesh from those difficult nooks and crannies. At this point, it also helps to give the skull a rinse with the hose or pressure washer.
- Fill the pot back to the previous level and return to a boil. This can be done while cleaning the skull.
- Add 1/2 cup baking soda and 1/2 cup dish soap. These will whiten the skull a bit and help remove and fat or grease.
- Reduce to a simmer and add the skull back in. Simmer another 3 hours. Add water as necessary to keep the skull submerged.

- Remove the skull from the pot and allow to cool enough to handle. Discard water.
- There should be no meat or cartilage left on the skull. The brains should shake out of the skull. It also helps to spray again with the hose. Make sure there is no meat (including brains) left in or on the skull.
- Pop out the “ear bones.” A surprising amount of gunk can build up here, and removing the bones makes life much easier. Insert a screwdriver or other tool into the ear canal, and work forcefully back and forth. It’s about finding the right angle, and once you do, they crack right out.

15. Allow the skull to dry for about 15 minutes. It just needs to be dry to the touch.
16. Brush on the Volume 40 Peroxide. Wear gloves. Do this on a piece of cardboard as the peroxide will bleach anything it touches. Allow this to sit for 1-2 hours to bleach the skull. Rinse well. Repeat if you want it whiter.

17. Allow the rinsed skull to completely dry.

That’s it! It’s that easy! Yes, it takes 8 hours. Yes, it requires some gear. And no, it’s not a pretty process. But in keeping with our “Buy Less. Do More.“ philosophy, doing a Euro Mount yourself is quite gratifying. And once you have all this stuff, you’re good to do like 10 skulls so the investment will pay off.